|
Home | Previous |
Next
Queuing
Multiple Projects | What If There's A Problem | Time
Chart
The Ripping Process
Once you set up the preferences, close Robot4rip. Put your DVD in the drive
(I think it is a good idea to clean the DVD with a
soft cloth first) and
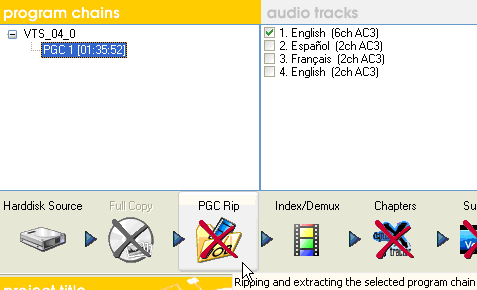
restart Robot4rip. All your settings will take affect and it will automatically
scan for your
DVD and
select
the correct
program chain (PGC)
and audio
track for you. Verify that it did select your audio
track. I have had it come up with an undefined audio track and I had to
select it myself. Also, it's a good idea to clean your DVD before ripping
it. If you get any ripping errors while DVD Decrypter is running, a dirty
DVD could be the culprit. I have cleaned very dirty DVDs using soapy water
and then drying them with a soft cotton cloth going from the center outward, not in
a circular motion.
If you chose not to enable Full Copy or ISO image, that icon will be
grayed out.

If you set up your
preferences to do a Full Copy, you must first enable it. Go to the Action
tab and click on Full Copy.
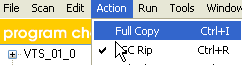
If you enabled Full Copy, but have decided not to activate it in the Action
menu, it will be crossed out in red.

You
can activate or deactivate any option by clicking on the icon.
Now you can rename your project title if you want. I
like to include the rating in my titles so I can remember which movies
my kids can and can't watch.
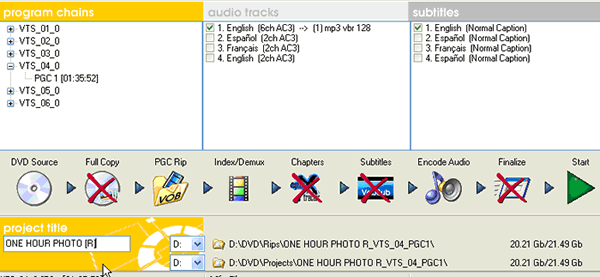
Press Start and let it rip!
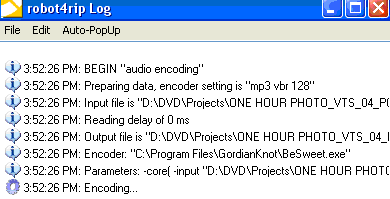
You can keep track of the progress on the Log screen. When
it reads "Successful" you are ready for the next step.
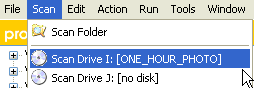
Queuing Multiple Projects
Sometimes you may want to backup several DVDs to DivX. Assuming you only
have 1 DVD ROM, once you have your Full Copy, ISO Image or VOB files copied
to your PC and your DVD ROM is no longer being accessed (and you can see
this in your log window), you can insert another DVD and Scan
the
drive.
Once the PGC
and Audio has been detected, you can press Start as before. If you
go to the Queue Manager (press Control-Q or select Window
> Show Queue Manager) you can see which project is currently
being processed and which ones are waiting to be processed. The queue
manager also allows you to cancel any projects you have queued and the
option to shut down Windows when done.

What If There's A Problem
Scenario 1:
If for some reason you had a problem, such as forgetting to make sure
the audio track was selected when if fact it was not or if the .d2v
cannot be read in Gordian Knot, you can open Robot4rip and Scan your
Rip folder and select your .ifo file.
Make sure your audio track is selected. Click on the PGC Rip icon to disable
it.
Click
Start and the movie will be indexed, demuxed and a .mp3
file will be created. When the log file reads "Successful" you
are ready for the next step.
Scenario 2:
If the audio (.mp3) file was not demuxed correctly or had errors, you
may have to index/demux outside of Robot4Rip. To do this, open DVD2AVIdg
which should be found in Start>Programs>Gordian Knot>Apps or
if not, look in Program Files\GordianKnot\DVD2AVI. Once you find DVD2AVIdg.exe,
run it and follow the steps below.
1. File>Open and select your first VOB file that was ripped from the
DVD. Once selected, A File List screen will display a list of all the
VOB files. If not, Add the other VOB files. Press OK.
2. Set Audio>Output Method>Decode to Wav. Everything else should already
be set correctly.
3. File>Save Project. Enter a file name and press Save.
4. Once completed you will have a .d2v file and .wav file.You will need
to convert your .wav to a .mp3 file. You can use a free program such as
FreeRIP to
convert from wav to mp3.
If using FreeRIP, select Tools>Convert Single
Audio File... Select the wav file to convert. Make sure the Output
format Encoding is set to MP3, Stereo is set to Stereo, Mode is set
to VBR. Min bitrate can either be 128 or 160 and Max bitrate can either
be 160 or 192. I use 160 Min and 192 Max since
I play my movies through a surround sound system. Don't worry
about the volume since we will use MP3Gain to increase it.
5. Now you can continue as usual.
Scenario 3:
If you were unable to rip the DVD at all or you could still not index/demux
the scanned rip folder, you can try:
- 1. Playing the DVD on your PC first. Sometimes files on the DVD are
locked and this will unlock them for you. Then you can try ripping
it again.
- 2. Try cleaning the DVD. I have
cleaned very dirty DVDs using soapy water and then drying them
with a soft cotton cloth going from the center outward, not in
a circular motion.
- 3. Try ripping the DVD using SmartRipper.
Once you have ripped the DVD with SmartRipper you can then
open Robot4rip and scan your rip folder as described above.
Using SmartRipper
Insert your DVD disc in your DVD-ROM drive and run SmartRipper.
A short authentication process will run to make sure all
the files are readable. If it finds unreadable files,
run a software
player (such as PowerDVD),
start playing the movie, close the player, then rerun SmartRipper. 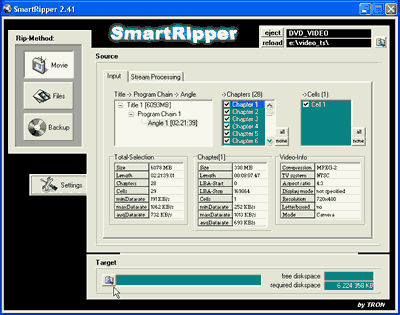
Make sure your Rip Method is "Movie" (on the left) and
the angle selected matches your movie length.
Next, choose your target
directory (or rip folder) at the bottom for your ripped files and
click "Start".
You can configure the settings before you start ripping but the
default ones work well in most cases.
4. Your DVD may have a serious scratch, therefore, making it unable
to be copied.
- 5. You may need to get an updated version of Robot4rip, which is usually
part of Gordian Knot.
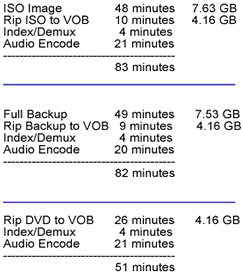
Time Chart
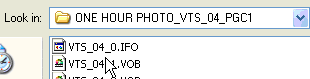
This will help give you an idea how long it takes to rip a DVD. For my example,
I am using the movie, One Hour Photo, which is 96 minutes long, wide
screen with a 1:85:1 ratio.
Previous |
Next | Top
|
