
|
User's Guide |
Previous | Next Adding MoviesOnce you have your options set to your liking, the next thing to do is add movies to your database. Movies can be added either one at a time or imported from a text file. The Personal Server edition also allows you to import movie files directly from your hard drive. Once the movies have been added, you may want to Search -> Simple where MPAA is Undefined (and possibly Unrated) and resolve any movies without MPAA ratings, especially if you will be searching or sorting on MPAA. IMDb.com does not have a MPAA rating or certification for every movie in their database. If you plan on accessing your movies across a network or from an external hard drive, read about Playing Movie Files before adding your movies. Duplicate file names are not allowed in the database, therefore, if a movie file has already been added to the database, it will not be added again. Duplicate movie titles are allowed if the media type is different or if the titles have movie files associated with them that are different. Therefore, as an example, you could have Shrek with media type avi with a file name c:\my dvds\shrek.avi and you could also have Shrek with media type avi with a file name f:\external\shrek.avi and you could also have Shrek with a media type of DVD. When movie information is retrieved from either IMDb.com or Amazon.com, the title stored in the database has the movie's release year appended to it in parentheses, allowing you to have multiple movies with different release years. In the Options -> Misc. screen you can choose whether or not to display the year next to the title. Importing Movie Information By UPC number - Amazon VS IMDb
Add Single (Tools -> Add -> Single)To add movies one at a time, go to the Tools -> Add -> Single screen. You can either browse to a movie file on your hard drive or a network hard drive, enter a movie title or enter a UPC number. You cannot get movie information from Amazon unless you enter a UPC number.
By Path\Filename or Title
Add Multiple (Tools -> Add -> Multiple)The fastest way to add movies to your database is to import movies listed in a text file. The Add Multiple screen actually creates a text file for you from the fields you enter on the screen. The quickest way to add DVD or VHS movies to your Movies field is to use a barcode scanner. Select either DVD or VHS for the media type. Position your cursor in the Movies field and scan the barcode (UPC number) on the back of your DVD or VHS movies. The scanner should automatically take you to the next line. If it does not, then press enter to go to the next line. Scan the next DVD or VHS and continue this process until all your DVD or VHS movies have been entered. Of course you can also add the UPC numbers manually. You do not have to enter the UPC numbers for the movies. You can also choose to add movies by title or path/file name although this screen is not the most efficient at adding movie files. For movie files it would be best to use the Import Txt screen and select the 'Create Text File' button to run PrintDir to create a text file of a directory for you. When adding movies to the Movies field, follow each title or file name by the enter key. Note: Each movie in the Movies field must be on a separate line. Note: Do not mix types in the Movies field. They must be all UPC numbers, all titles, or all movie file names. Note: If the movies are not UPC numbers, you cannot get movie info from Amazon.com. Cinema Premiere requires UPC numbers to retrieve movie information from Amazon.com. The location field is where the media resides, such as 'Left Bookshelf'. If you do not specify a location for the movies, the location field for each movie will be blank. If you want all the movie files to have the same location, enter that location in the location field. If you want some movies to have a different location, each movie can have a location specified for it by appending |location| to the end of the movie file name, title or UPC number in the Movies field. The |location| will take precedence over the location entered in the location field if one was entered. When either of the 'GO' buttons are pressed, a text file is created from the screen information and uploaded to the server and each movie in the text file is processed. When it has completed, a list of all the movies and the title they were added as is displayed on the screen. A link to download the text file that was created with the information you entered on the screen will also be displayed. This same information, excluding the link to download the text file, is written to the Log File (addlog.txt) which can be viewed or downloaded and edited from the Tools -> Add -> Log File screen. This is very useful if you used the 'Quick Add' so you can cross reference your movies to make sure they were added as the correct title. If a movie was not added correctly, Edit the movie, type in the correct title, press 'Get IMDb Info', select the correct title and press 'Update Database'. The time it takes to retrieve the movie information will vary, but has little to do with the speed of your internet connection. All processing is done at the server. Enter Movie Info Manually
Get Movie Info From IMDb.com
Get Movie Info From Amazon.com
Import Text File (Tools -> Add -> Import Txt)The fastest way to add movies to your database is to import movies listed in a text file. The quickest way to add DVDs or VHS videos to a text file is to use a barcode scanner. Open a text file. On the first line add ::UPC media type where media type is either DVD or VHS. Do not mix DVDs and VHS tapes in the same text file. Position your cursor to the next line and scan the barcode (UPC number) on the back of your DVD or VHS. The scanner should automatically take you to the next line. If it does not, then press enter to go to the next line. Scan the next DVD or VHS and continue this process until all your DVDs or VHS tapes have been entered. To import movies from a text file, go to the Tools -> Add -> Import Txt screen. On the Import Txt screen there is a 'Create Text File' button that will allow you to easily create and/or edit a text file of your movie files on your hard drive. It will also allow you to open your text editor to create a new text file of either movie titles or UPC numbers. You MUST be running the CP browser for these features to work.(Learn how to Create a Text File.) Browse to and select a .txt file that contains a list of movie titles, file names or UPC numbers. The file names must include the drive letter and path. The .txt file must contain at least 2 lines of data. The first one or two lines allow you to specify a media type and location for your movies. If you do not specify a location for the movies, the location field for each movie will be blank. If you do not specify a media type, for movie files, the media type will be the movie's file extension and for movie titles, the media type will be blank. You MUST specify a media type for UPC numbers because it is used as part of the search key at Amazon.com. If you want all the movies to have the same location, on the first line of the text file add :location where location will be added to the location field for each movie. If you want some movies to have a different location, each movie can have a location specified for it by appending |location| to the end of the movie file name, title name or UPC number. The |location| will take precedence over the :location if one was added. If you want all the movie titles to have the same media type or all the move files to have the same media type other than their file extension, then on either the first or second line (depending whether you added :location ), add ::media type where media type will be added to the media field for each movie. Note: If you are adding movies by their UPC number, then you MUST have ::UPC media type where media type is either DVD or VHS. Be sure to specify the correct media type because it is used as part of the search key at Amazon.com. When adding a movie with a media type that is not already defined in the Media Types list on the Tools -> Options -> Miscellaneous screen, the media type will automatically be added to the list for you. All blank lines, lines containing the text 'Path/Names' or 'Sub Total', lines with a path but without a file extension and lines with a file extension not defined in the Options screen will all be skipped. So be sure all the file extensions you want to add are defined in the Options -> Miscellaneous screen -> Movie File Extensions:. Example 1 of .txt file with movie files
In the above example, Elf would be added to the movie database with the location of 'Maxtor External' and the media type of 'DivX'. If DivX was not already defined in the Media Types list, it would automatically be added. Shrek would be added to the movie database with the location of 'Maxtor External - My Favorites' and the media type of 'DivX'. If we had left out the ::DivX from the .txt file, both movies would have had the media type of avi. Example 2 of .txt file with movie titles:
In the above example, Vanilla Sky would be added to the movie database with the location of '71' and the media type of 'DVD'. A Few Good Men will be added to the movie database with the location of 'Book Shelf' and media type of 'DVD'. What Women Want would be added to the movie database with no location and the media type of 'DVD'. Note the R and PG13 in brackets. Everything after the left bracket, including the left bracket, except for the location field, will be ignored. If we had added :Family Room to the first or second line of .txt file, the only thing that would change is that What Women Want would now have the location of 'Family Room'. Example 3 of .txt file with UPC numbers:
In the above example, the first UPC number would be added as A Dog Of Flanders with the location of 'Right Bookshelf' and media type of DVD. The second UPC number would be added as Black Beauty with the location of 'Left Bookshelf' and media type of DVD. The blank line above the first UPC number is just skipped. Enter Movie Info Manually
Get Movie Info From IMDb.com
Get Movie Info From Amazon.com
The time it takes to retrieve the movie information will vary, but has nothing to do with the speed of your internet connection unless you are running the Personal Server edition. All processing is done at the server. Import Hard Drive (Personal Server Edition Only)To import movies from your hard drive, go to the Tools -> Add -> Import HD screen. You can either browse to any file in the directory of movies you want to import or you can enter the drive letter and path. Movie files that are already in your database will be skipped. The 'Get IMDb Info?' and 'Quick Add?' is the same for importing the hard drive as stated above for importing a text file. Add Log (Tools -> Add -> Log File)All movies that are added to the database are logged in a text file which can be viewed or downloaded and edited from the Tools -> Add -> Log File screen. The log file contains either the date and time the single movie is added or the date and time the import session starts and completes. It also contains the name of the original title or file name and the name of the title it was added as. This is very useful if you used the 'Quick Add' so you can cross reference your movies to make sure they were added as the correct title. If a movie was not added correctly, Edit the movie, type in the correct title, press 'Get IMDb Info', select the correct title and press 'Update Database'. View In Browser Window - This will open the Add Log file in a new window. Download File (Open or Save as addlog.txt) - When you click this link, the Download File screen will pop up. Select Save to save the file to your local hard drive or select Open to open the file with your default editor that is associated with the .doc file type. The text file was renamed to .doc to allow it to be downloaded (.txt files will open in a browser window). You may wish to save it as a .txt but it is not necessary. If the file opens in your browser window instead of displaying the download screen, a possible cause is that .doc is not defined as a file type on your computer. Open Windows Explorer and select Tools -> Folder Options -> File Types. Scroll down the list of Registered file types and see if 'doc' is there. If not, click on 'New' to add it. Click Change (Opens With) and select or Browse to Notepad. Open/Edit With Default Editor - This is only available in the Personal Server edition and allows you to open and edit the add log file with your default editor directly without having to download it first. Clear Log File - This will clear out the contents of the log file. |
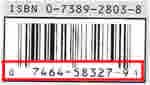 The UPC number is located below the barcode. The UPC code for this example is 074645832791.